> ## Documentation Index
> Fetch the complete documentation index at: https://strettch-make-section-id-optional.mintlify.site/llms.txt
> Use this file to discover all available pages before exploring further.
# Manage Domains and DNS Records
> End-to-end guide to registering a domain on Strettch Cloud, pointing nameservers, verifying activation status, and understanding domain lifecycle.
## Managing Domain
1. Navigate to **Domains** tab.
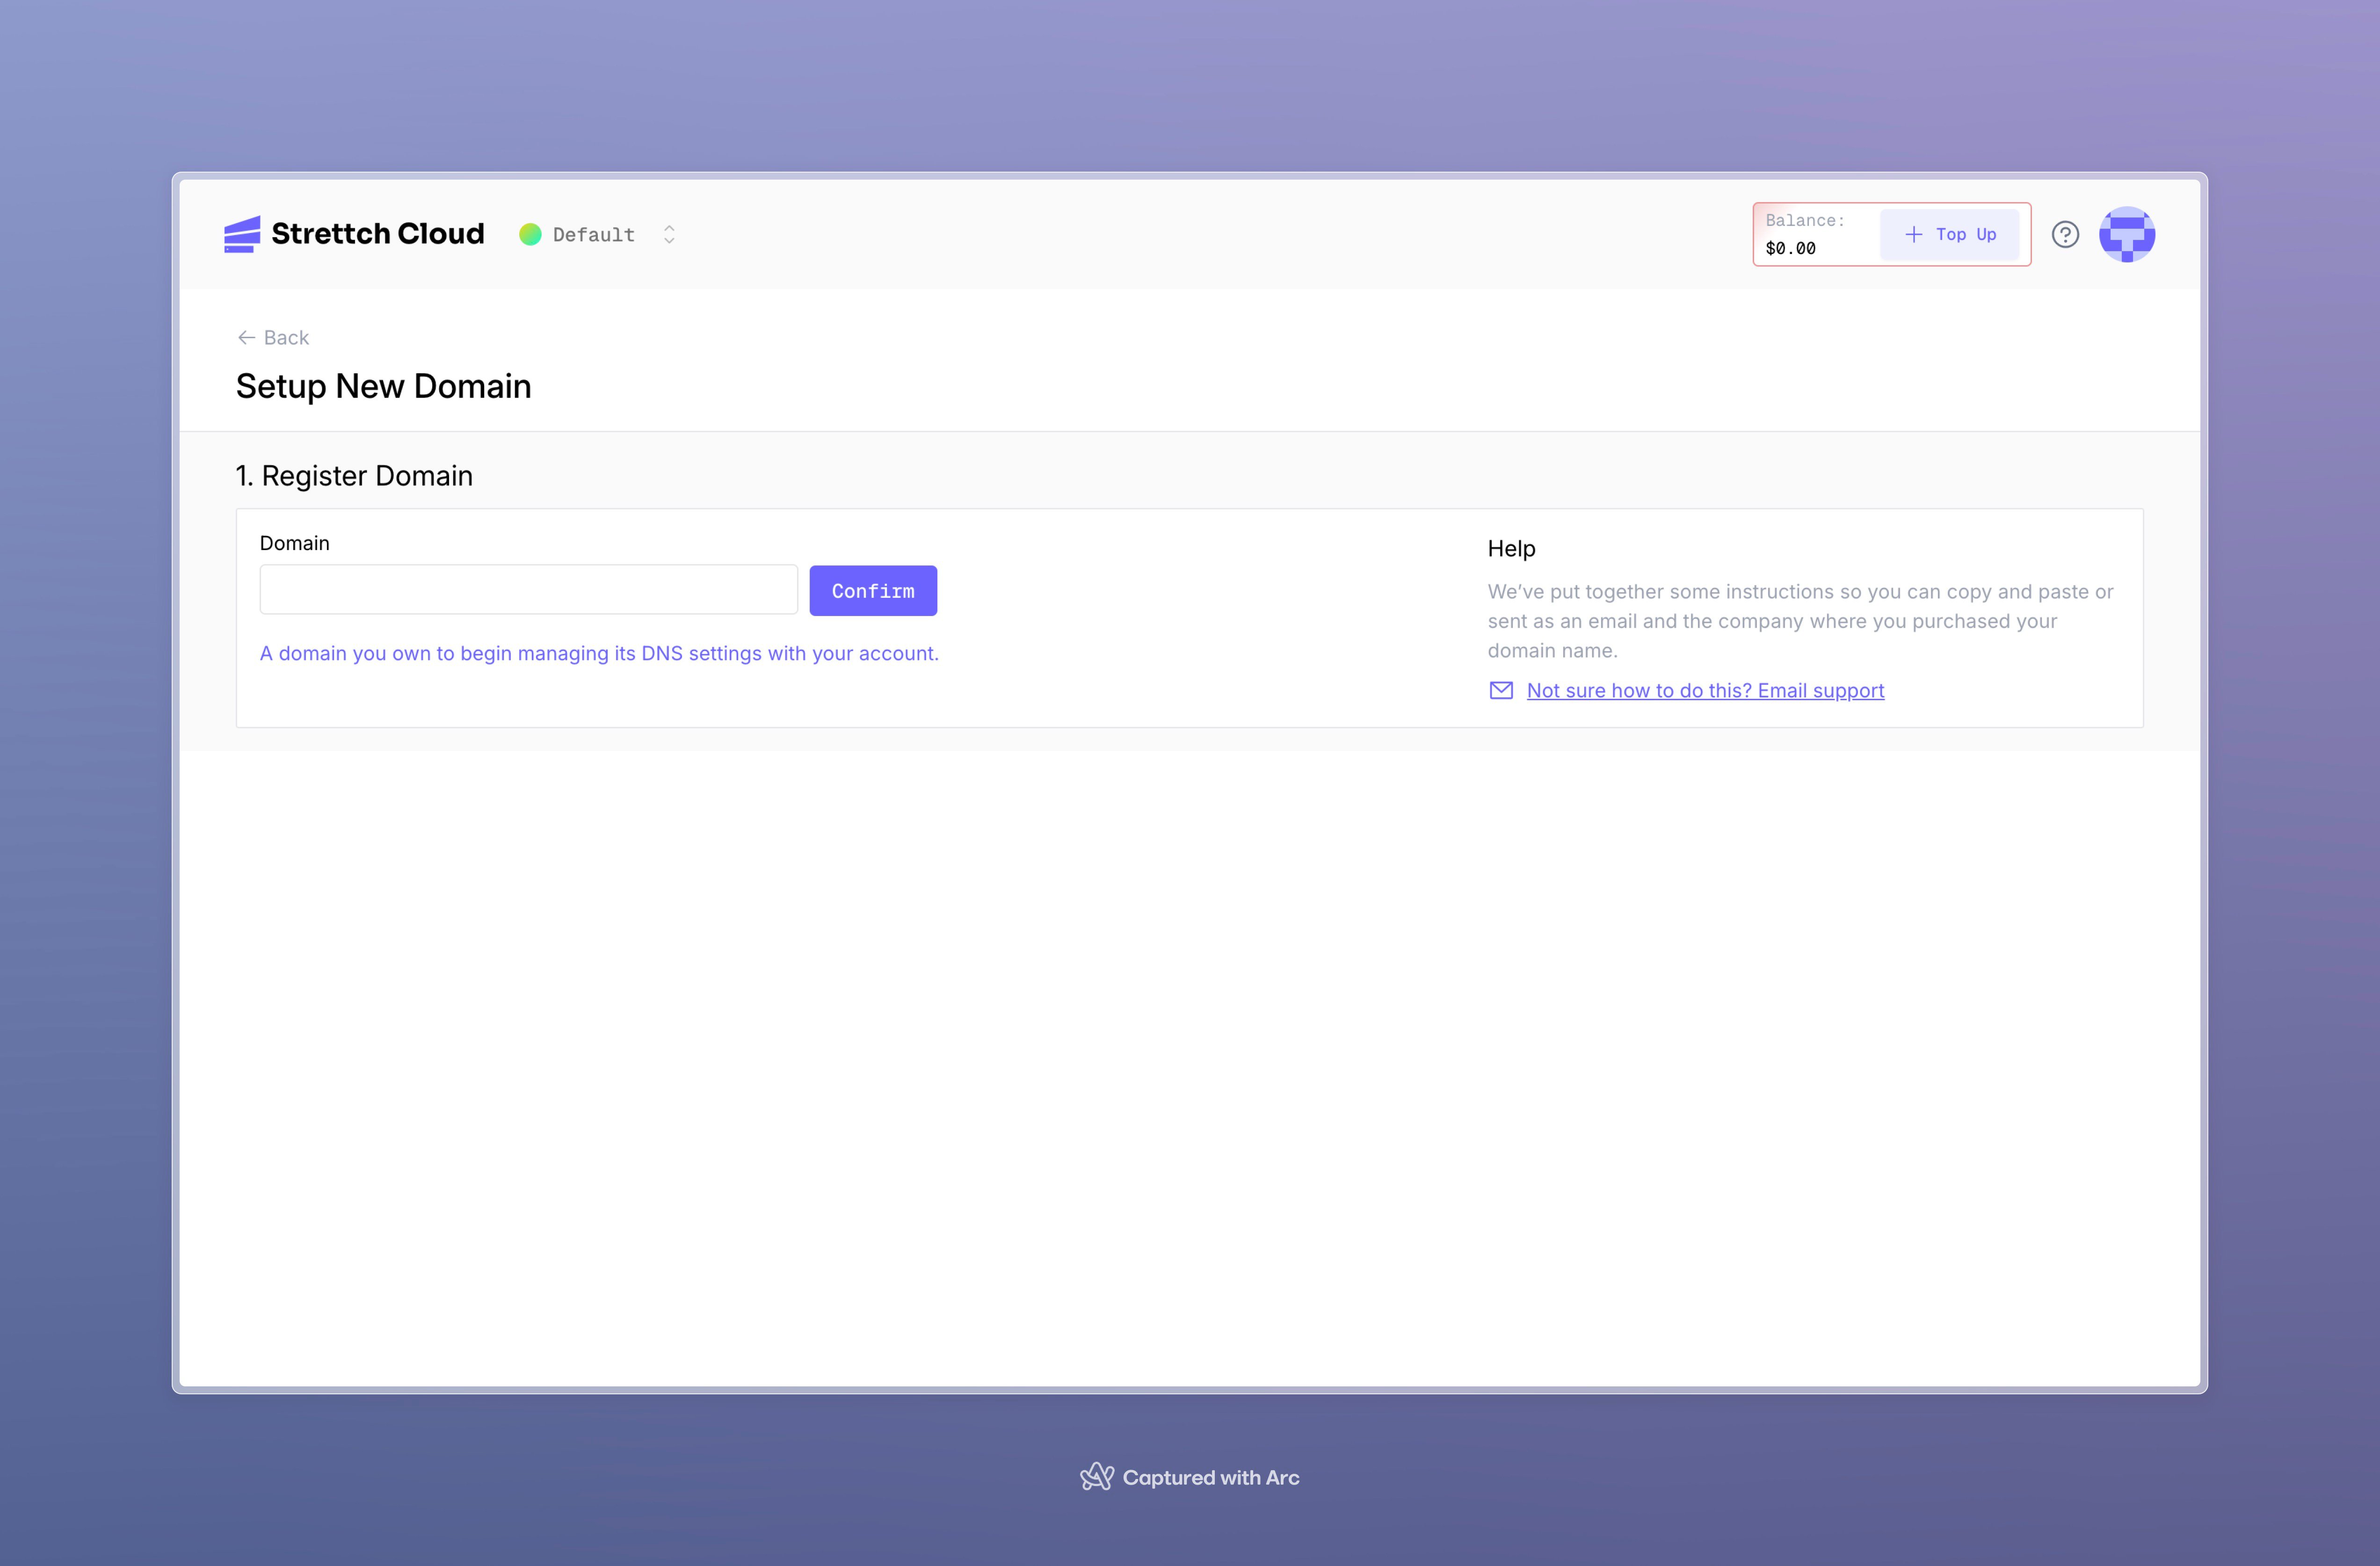
## Create new domain
First, Click **Register Domain**. Input an domain address click confirm to validate the availability of the respective domain name. and click on **Confirm** to validate it.
* If a domain is not valid you will receive a toast and you may change the domain name.
* when a domain is valid and hence confirmed you will move to the next steps.
 After validating your domain, it's time to add the nameservers provided in the next step to your domain provider. To do this, you should go to the table on the second step and click on **copy icons**, thus copying the nameservers. Finally, just paste the nameservers to your provider.
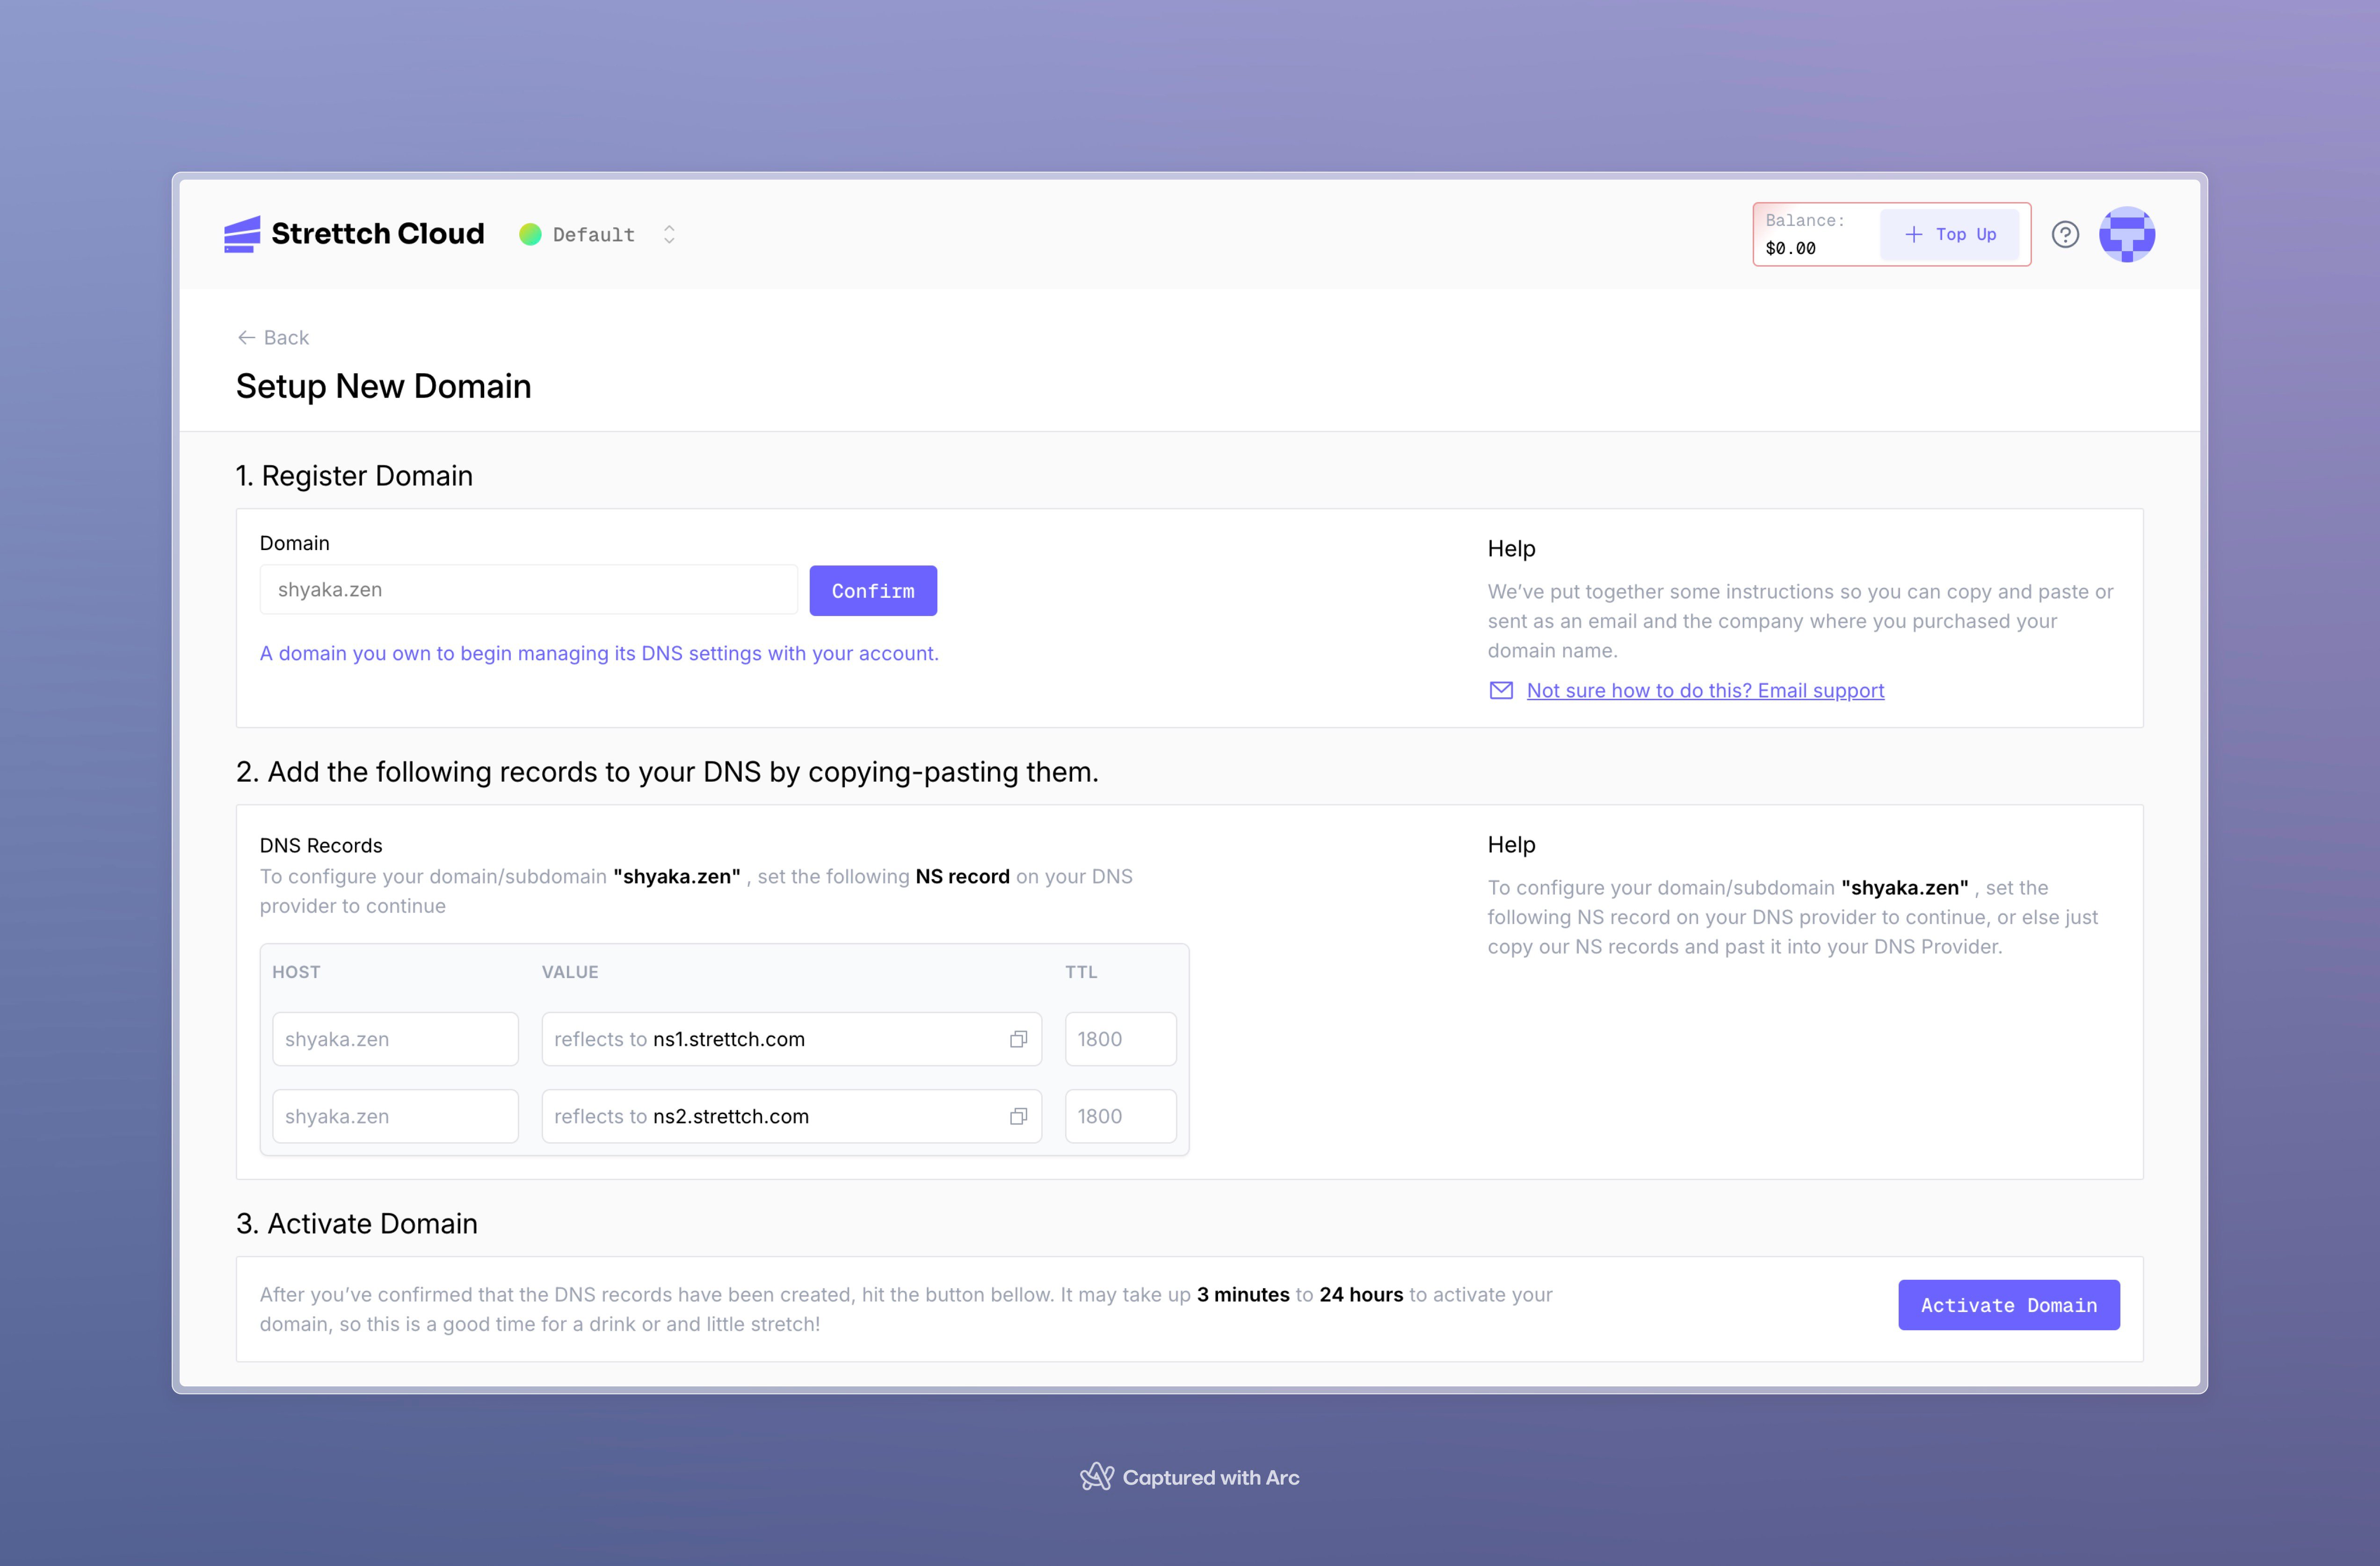 Now that you already have added the nameserverss to your domain, you need to activate the domain. To do this, you should still be in the **Domains** tab on setting up new domain, scroll down and look for "Activate domain" button. Here, you should activate domain by clicking the button
Remember to copy and paste the nameservers provided to you to you domain provider, otherwise the domain you will create will be inactive until you do so.
## Verify you domain Status
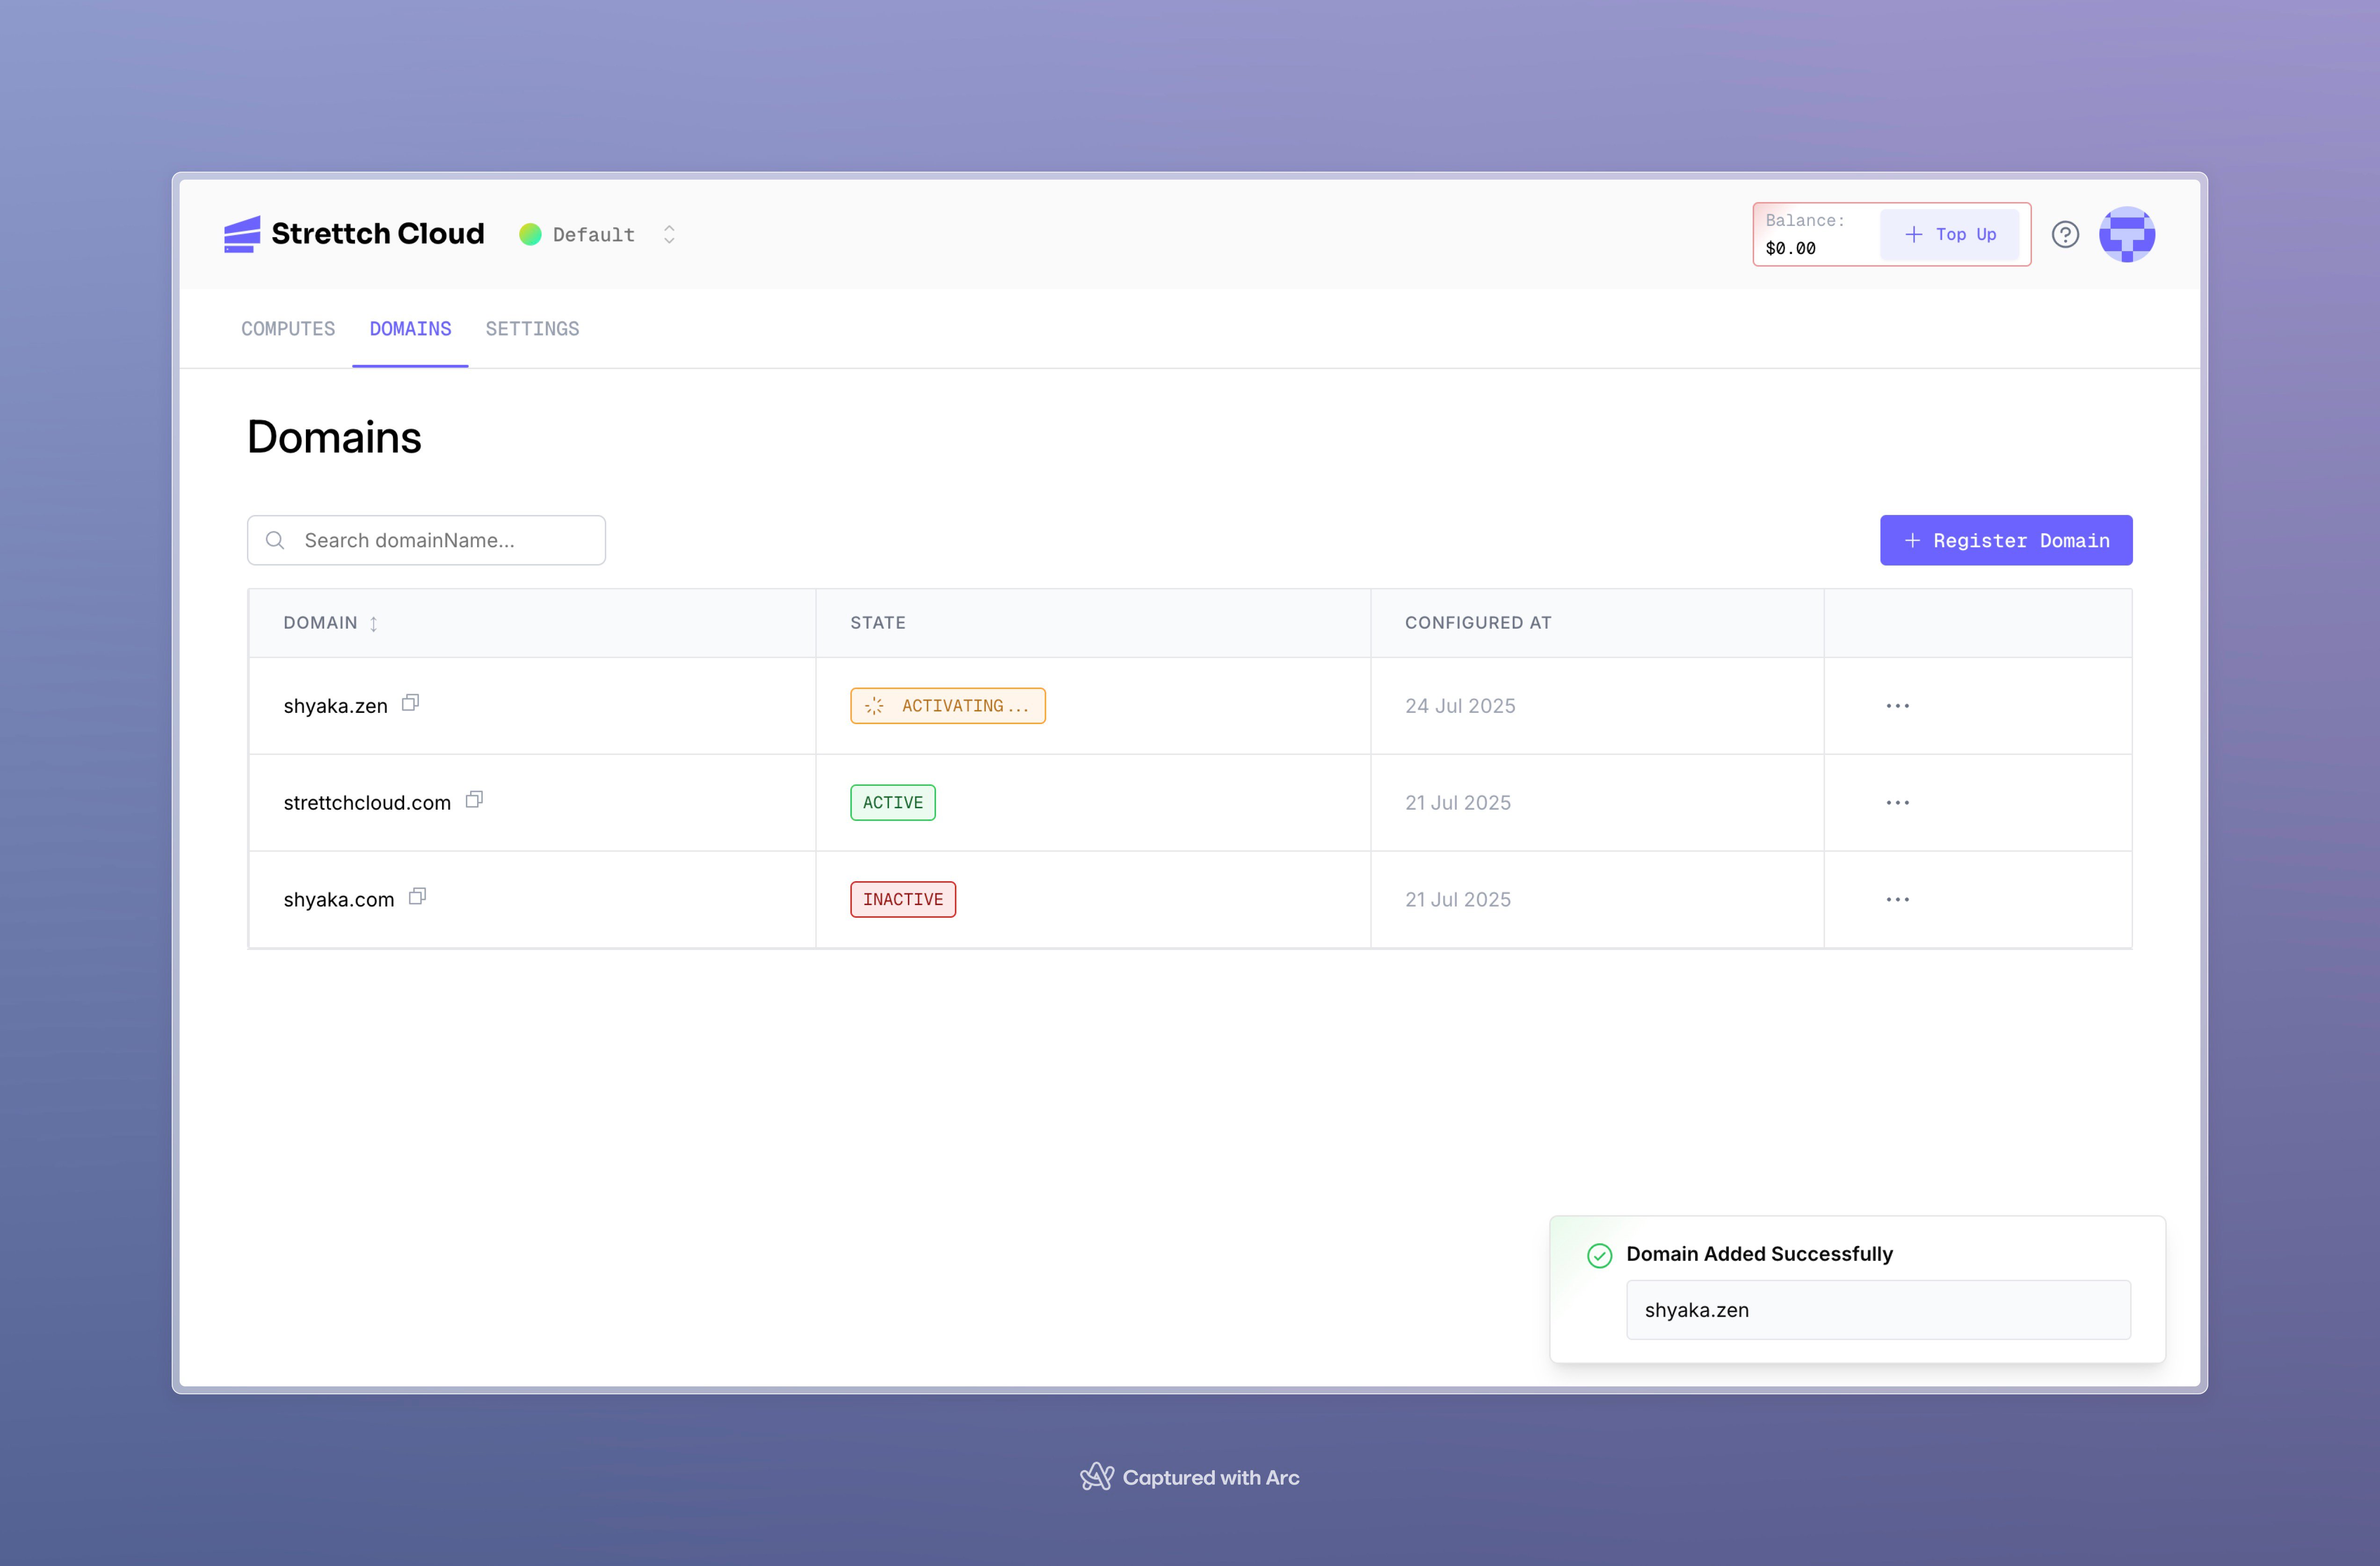
After creating your domain you will be redirected to the listing of all domains specific to that team. where you can easily identify the statuses of the domains created:
* after a domain is created it may take **3 min** to **24 hours** to activate it and when the domain is activating you will se the status **activating**
* A domain that is active and thus operation will have an active status and success flag.
* A domain that goes beyond 24 hours whilst still being not active will be considered as inactive.
If a domain goes beyond 24 hours and still not active, we recommend to check your DNS provider and check if you domain has our nameservers configured on it.
Now that you already have added the nameserverss to your domain, you need to activate the domain. To do this, you should still be in the **Domains** tab on setting up new domain, scroll down and look for "Activate domain" button. Here, you should activate domain by clicking the button
Remember to copy and paste the nameservers provided to you to you domain provider, otherwise the domain you will create will be inactive until you do so.
## Verify you domain Status
After creating your domain you will be redirected to the listing of all domains specific to that team. where you can easily identify the statuses of the domains created:
* after a domain is created it may take **3 min** to **24 hours** to activate it and when the domain is activating you will se the status **activating**
* A domain that is active and thus operation will have an active status and success flag.
* A domain that goes beyond 24 hours whilst still being not active will be considered as inactive.
If a domain goes beyond 24 hours and still not active, we recommend to check your DNS provider and check if you domain has our nameservers configured on it.
 ## Managing DNS records
Once a domain has been added and is using Strettch cloud's nameservers, you can view its DNS records from the **Domains** page. From there, you can view, add, verify, remove the records, or add presets.
To make sure DNS records are applied, and to allow you to manage them, your domain needs to use **Strettch Cloud's nameservers** . If you are using a third-party domain, you will be provided with the Strettch CLoud's nameservers to copy and use with your registrar.
Here's a list of record types we support:
| Record Type | Hostname (example) | Description |
| ----------- | ---------------------- | ---------------------------------------------------------------------------------- |
| **A** | example.com | redirects to 192.0.2.1 |
| **AAAA** | example.com | redirects to 2001:0db8:85a3:0000:0000:8a2e:0370:733 |
| **SRV** | -sip.\_tcp.example.com | service located at 10 60 5060 sip.example.com |
| **TXT** | \_dmarc.example.com | returns v=DMARC1; p=none; rua=mailto:[dmarc@example.com](mailto:dmarc@example.com) |
| **MX** | example.com | mail handled by mail.example.com |
| **CNAME** | blog.example.com | is an alias of wiki.example.com |
## Important Limitation: Subdomain Zones on Strettch Cloud Nameservers
**What's NOT supported:**
You cannot create a subdomain as an independent DNS zone that uses **Strettch Cloud's nameservers** (ns1.strettch.com, ns2.strettch.com) when the parent domain is also using Strettch Cloud's nameservers.
**Example of what's NOT possible:**
```
strettchcloud.com
├─ Nameservers: ns1.strettch.com, ns2.strettch.com ✅
project.strettchcloud.com (as separate zone)
└─ Nameservers: ns1.strettch.com, ns2.strettch.com ❌ NOT SUPPORTED
```
In this scenario, you cannot manage `project.strettchcloud.com` as its own independent domain zone with isolated DNS records within Strettch Cloud.
**What IS supported:**
**Option 1:** Delegate a subdomain to **external DNS providers** using NS records:
```
strettchcloud.com
├─ Nameservers: ns1.strettch.com, ns2.strettch.com ✅
└─ NS record: project → ns1.vercel-dns.com, ns2.vercel-dns.com
project.strettchcloud.com (managed on Vercel)
└─ Nameservers: ns1.vercel-dns.com, ns2.vercel-dns.com ✅ SUPPORTED
```
**Option 2:** Delegate a subdomain to **Strettch Cloud** when the parent domain is on a different provider:
```
strettchcloud.com (managed on Cloudflare)
├─ Nameservers: ns.cloudflare.com, secondary.cloudflare.com ✅
└─ NS record: project → ns1.strettch.com, ns2.strettch.com
project.strettchcloud.com (managed on Strettch Cloud)
└─ Nameservers: ns1.strettch.com, ns2.strettch.com ✅ SUPPORTED
```
**What this means for you:**
* ✅ You can add any subdomain records directly in your main domain (e.g., `api.project.strettchcloud.com`)
* ✅ You can delegate subdomains to external DNS providers like AWS Route 53, Vercel, etc.
* ✅ You can delegate subdomains TO Strettch Cloud when the parent domain is elsewhere
* ❌ You cannot create subdomain zones that also use Strettch Cloud's nameservers when the parent is on Strettch Cloud
Now let's go straight to adding our DNS records.
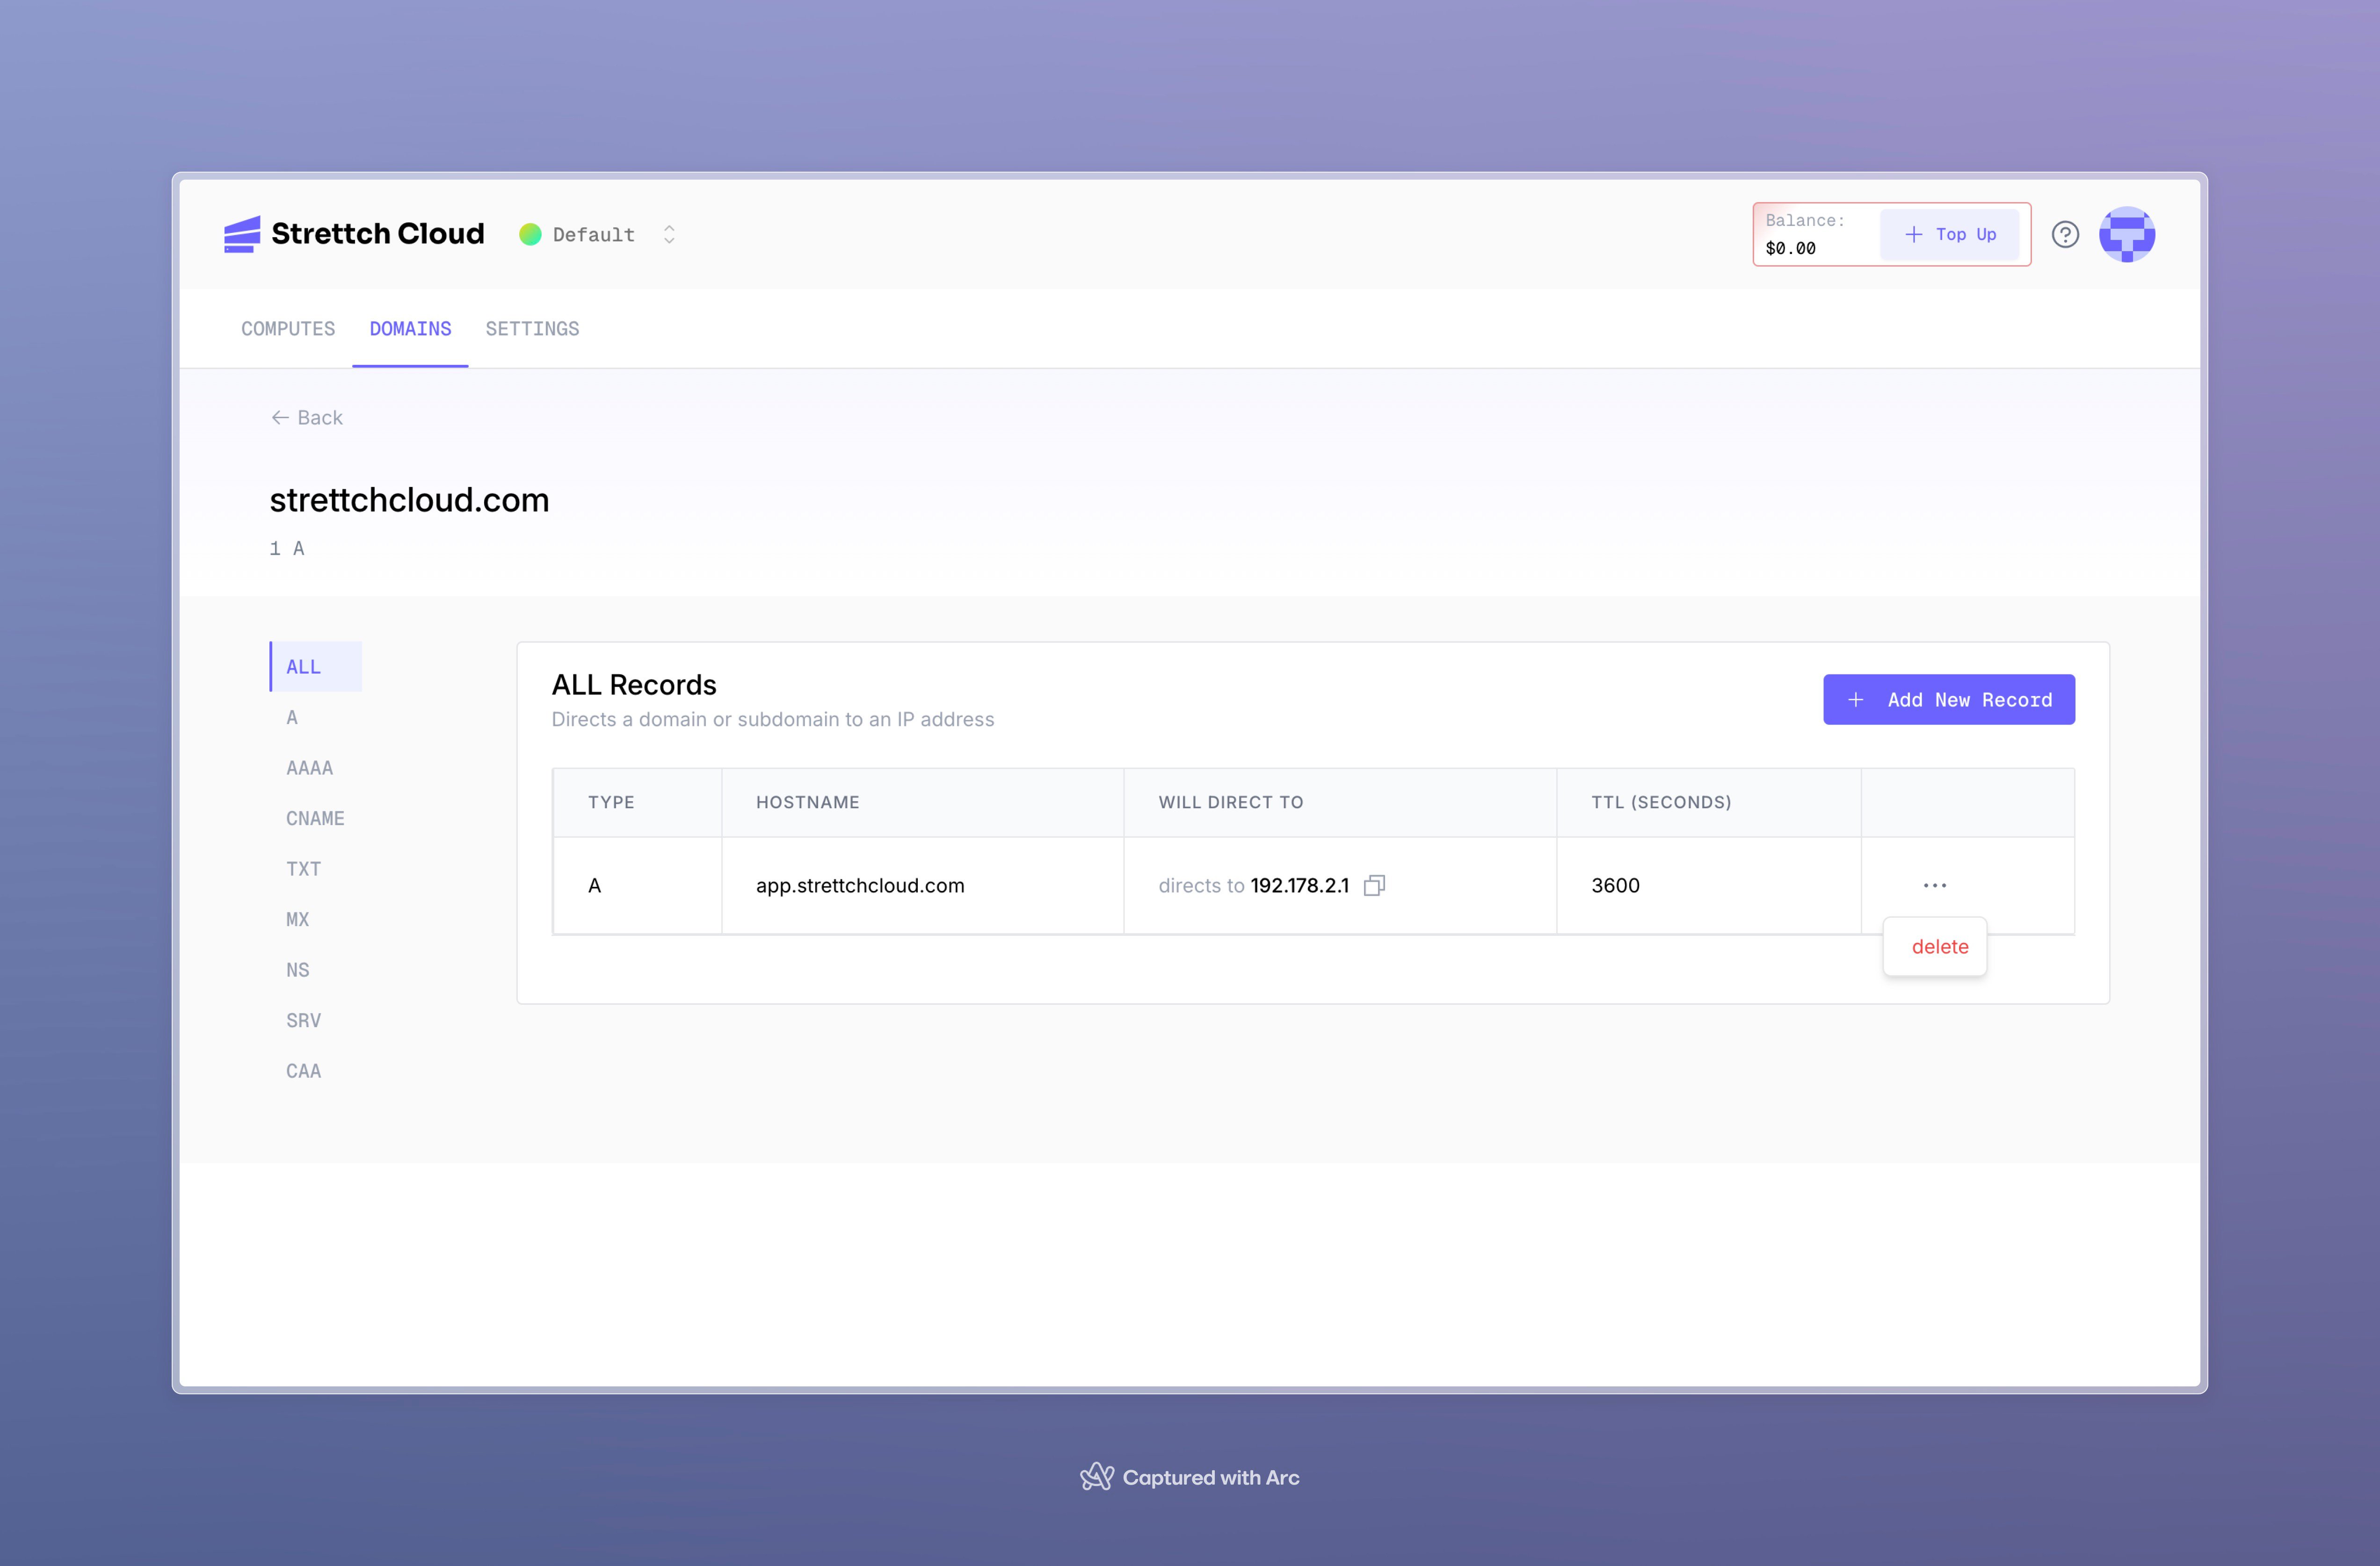
On your team's **dashboard**, select the Domains tab. From the Domains page, click on a domain of your choice to view its Advanced Settings page.
Once on the Advanced Settings page of your domain, select the **Add new record** button to fill out the DNS Record form. Once complete, click on the **Create Record** button.
## Managing DNS records
Once a domain has been added and is using Strettch cloud's nameservers, you can view its DNS records from the **Domains** page. From there, you can view, add, verify, remove the records, or add presets.
To make sure DNS records are applied, and to allow you to manage them, your domain needs to use **Strettch Cloud's nameservers** . If you are using a third-party domain, you will be provided with the Strettch CLoud's nameservers to copy and use with your registrar.
Here's a list of record types we support:
| Record Type | Hostname (example) | Description |
| ----------- | ---------------------- | ---------------------------------------------------------------------------------- |
| **A** | example.com | redirects to 192.0.2.1 |
| **AAAA** | example.com | redirects to 2001:0db8:85a3:0000:0000:8a2e:0370:733 |
| **SRV** | -sip.\_tcp.example.com | service located at 10 60 5060 sip.example.com |
| **TXT** | \_dmarc.example.com | returns v=DMARC1; p=none; rua=mailto:[dmarc@example.com](mailto:dmarc@example.com) |
| **MX** | example.com | mail handled by mail.example.com |
| **CNAME** | blog.example.com | is an alias of wiki.example.com |
## Important Limitation: Subdomain Zones on Strettch Cloud Nameservers
**What's NOT supported:**
You cannot create a subdomain as an independent DNS zone that uses **Strettch Cloud's nameservers** (ns1.strettch.com, ns2.strettch.com) when the parent domain is also using Strettch Cloud's nameservers.
**Example of what's NOT possible:**
```
strettchcloud.com
├─ Nameservers: ns1.strettch.com, ns2.strettch.com ✅
project.strettchcloud.com (as separate zone)
└─ Nameservers: ns1.strettch.com, ns2.strettch.com ❌ NOT SUPPORTED
```
In this scenario, you cannot manage `project.strettchcloud.com` as its own independent domain zone with isolated DNS records within Strettch Cloud.
**What IS supported:**
**Option 1:** Delegate a subdomain to **external DNS providers** using NS records:
```
strettchcloud.com
├─ Nameservers: ns1.strettch.com, ns2.strettch.com ✅
└─ NS record: project → ns1.vercel-dns.com, ns2.vercel-dns.com
project.strettchcloud.com (managed on Vercel)
└─ Nameservers: ns1.vercel-dns.com, ns2.vercel-dns.com ✅ SUPPORTED
```
**Option 2:** Delegate a subdomain to **Strettch Cloud** when the parent domain is on a different provider:
```
strettchcloud.com (managed on Cloudflare)
├─ Nameservers: ns.cloudflare.com, secondary.cloudflare.com ✅
└─ NS record: project → ns1.strettch.com, ns2.strettch.com
project.strettchcloud.com (managed on Strettch Cloud)
└─ Nameservers: ns1.strettch.com, ns2.strettch.com ✅ SUPPORTED
```
**What this means for you:**
* ✅ You can add any subdomain records directly in your main domain (e.g., `api.project.strettchcloud.com`)
* ✅ You can delegate subdomains to external DNS providers like AWS Route 53, Vercel, etc.
* ✅ You can delegate subdomains TO Strettch Cloud when the parent domain is elsewhere
* ❌ You cannot create subdomain zones that also use Strettch Cloud's nameservers when the parent is on Strettch Cloud
Now let's go straight to adding our DNS records.
On your team's **dashboard**, select the Domains tab. From the Domains page, click on a domain of your choice to view its Advanced Settings page.
Once on the Advanced Settings page of your domain, select the **Add new record** button to fill out the DNS Record form. Once complete, click on the **Create Record** button.
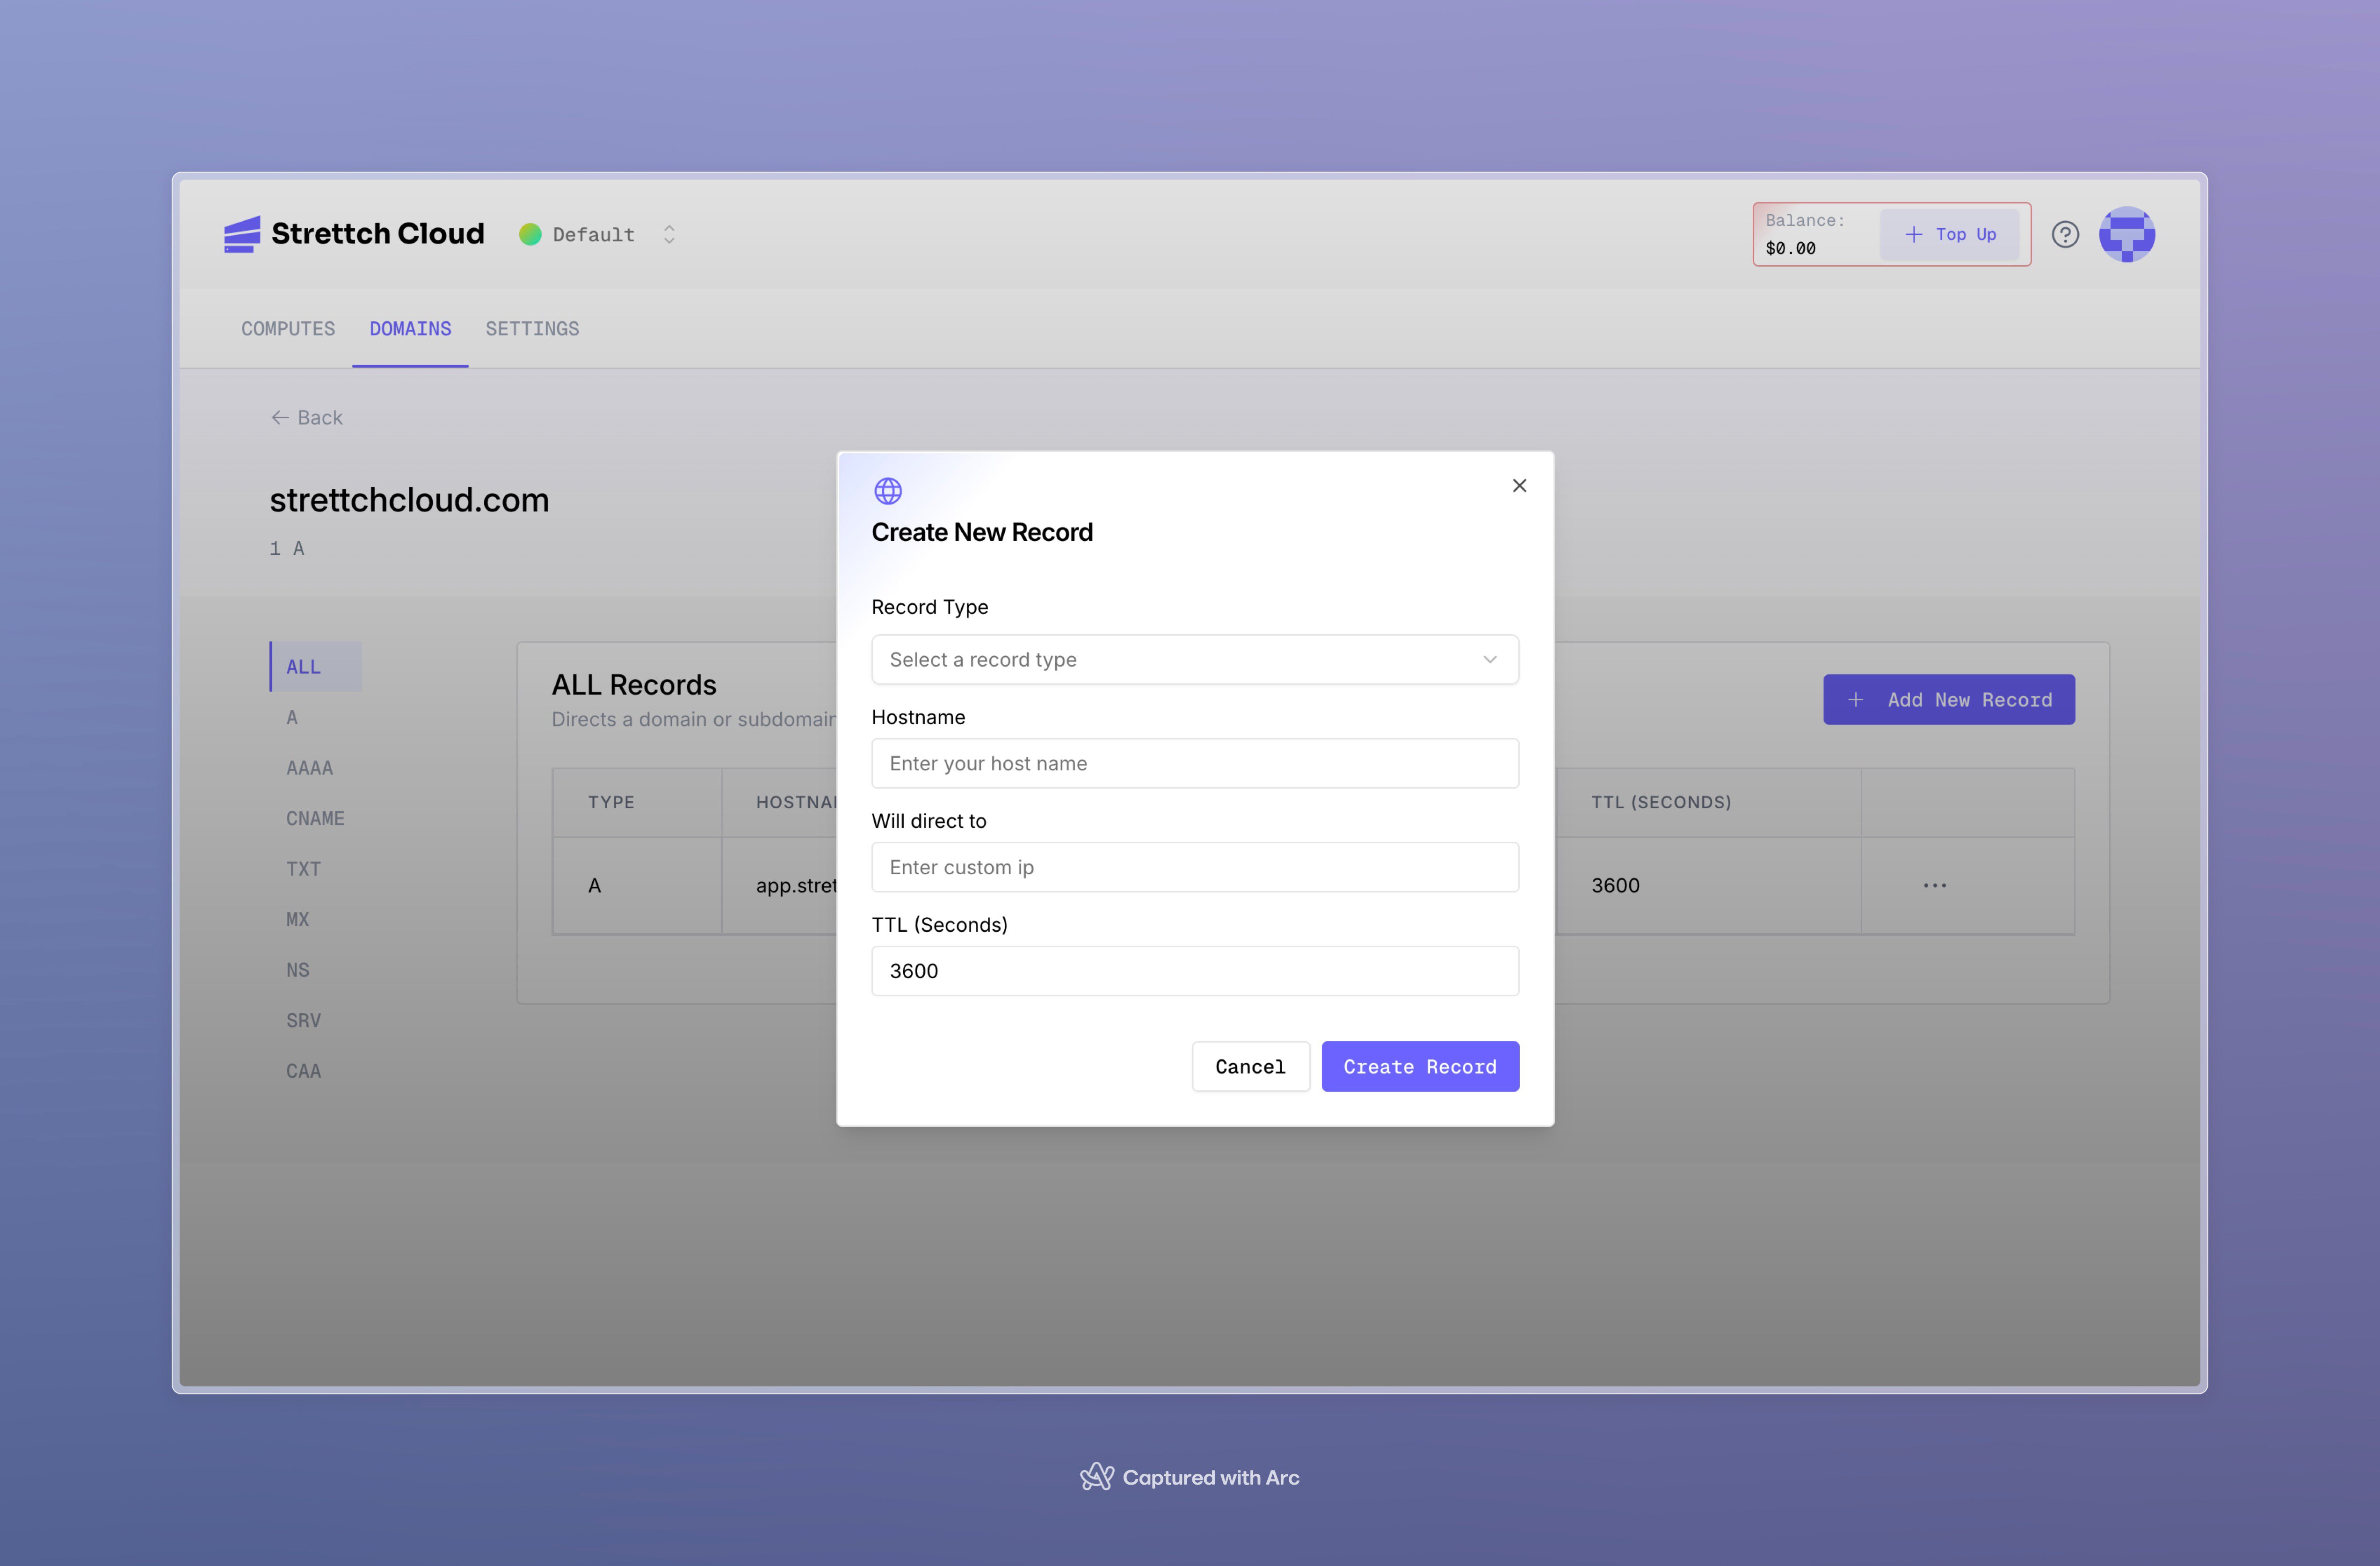 You can then create a new DNS record with the following data:
* **Name:** The prefix or location of the record. For **[www.example.com](http://www.example.com)**, the name argument would be **www**.
* **Type:** Types can be `A`, `AAAA`, `CAA`, `CNAME`, `MX`, `NS`, `SRV`, or `TXT`.
* **Value:** The value of the record.
* **TTL:** Default is 60 seconds. For advanced users, this value can be customized.
* **Comment:** An optional comment to provide context on what this record is for.
* **More:** Some records will require more data. MX records, for example, will request "priority".
## Verifying DNS Records
Once DNS records have been changed, you may wish to check that these have been set correctly. There are many third-party tools that do this, such as DNS Checker and DNS Map - these show the state of your DNS records in different regions of the world.
You can also use the dig command to check the DNS record for your domain:
```bash A records example on Windows, MacOs, Linux theme={null}
$ dig A api.example.com +short
```
```bash Mx example on Windows, MacOs, Linux theme={null}
$ dig MX example.com +short
```
## Removing DNS Records
To remove DNS records:
* On your team's **dashboard**, select the **Domains** tab. From the Domains page, click on a domain of your choice to view its Advanced Settings page.
* Select the ellipsis (⋯) to access the context menu and select **Delete**. Follow the prompts to delete the record.
You can then create a new DNS record with the following data:
* **Name:** The prefix or location of the record. For **[www.example.com](http://www.example.com)**, the name argument would be **www**.
* **Type:** Types can be `A`, `AAAA`, `CAA`, `CNAME`, `MX`, `NS`, `SRV`, or `TXT`.
* **Value:** The value of the record.
* **TTL:** Default is 60 seconds. For advanced users, this value can be customized.
* **Comment:** An optional comment to provide context on what this record is for.
* **More:** Some records will require more data. MX records, for example, will request "priority".
## Verifying DNS Records
Once DNS records have been changed, you may wish to check that these have been set correctly. There are many third-party tools that do this, such as DNS Checker and DNS Map - these show the state of your DNS records in different regions of the world.
You can also use the dig command to check the DNS record for your domain:
```bash A records example on Windows, MacOs, Linux theme={null}
$ dig A api.example.com +short
```
```bash Mx example on Windows, MacOs, Linux theme={null}
$ dig MX example.com +short
```
## Removing DNS Records
To remove DNS records:
* On your team's **dashboard**, select the **Domains** tab. From the Domains page, click on a domain of your choice to view its Advanced Settings page.
* Select the ellipsis (⋯) to access the context menu and select **Delete**. Follow the prompts to delete the record.
 **Need help?** Contact our [support team](mailto:cloud@strettch.com) or stay tuned at [our site](https://cloud.strettch.com).